


The joy of building rifles - for beginners
- Posted on
- By Write Winger
- 0
I've always had a fascination with weapons of all kinds. I think it's due having an engineer's brain and an artist's soul - having an appreciation for the meshing of design, function, and art.
So naturally, when I found out I could build my own rifle, I knew I had found my new expensive hobby
I've always had a fascination with weapons of all kinds. I think it's due having an engineer's brain and an artist's soul - having an appreciation for the meshing of design, function, and art.
So naturally, when I found out I could build my own rifle, I knew I had found my new expensive hobby.
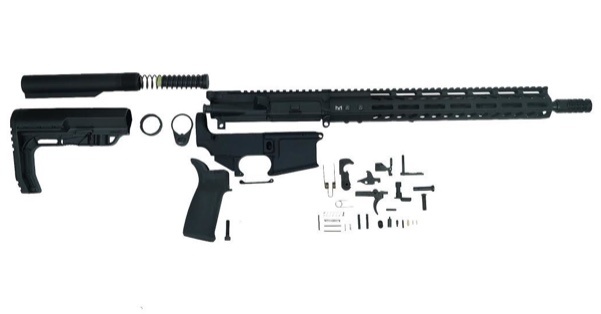
My first rifle started as a store bought stripped lower receiver, before long guns were registered with the state of CA like handguns. I remember telling the guy at the counter, "I should have done this a long time ago" when I picked up this oddly shaped hunk of metal with holes in it after waiting 10 days. Had to buy a gun lock for it too, per the law, because wouldn't want a hunk of metal with holes in it loading itself and going off in the parking lot or something. And thank God I had those 10 days to "cool off", someone could have been bludgeoned to death with that thing.
After a few YouTube tutorials, I quickly learned how to install a lower parts kit, buffer tube, and stock. A lot of stocks and buffer tubes come as a a set, but if you're going to put one together part by part, make sure you're buying compatible buffer springs, buffer, and tube. There are typically two sizes: rifle length, which is for a full length stock, and carbine, which typically will go with a telescoping stock. There’s also different size and weight buffers and springs for different calibers, and there are exceptions to every rule, but this is basic.
The lower parts kit is pretty straight forward, but there are a few things to point out before you make the same mistakes others have. When installing tiny springs and detents, do it in a large plastic bag. Use needle nose pliers and even a box cutter blade to hold them down. This will save you lots of time not spent searching for this tiny thing after it goes shooting across the room.
Also, use painter's tape around areas you'll need to hammer/tap in roll pins with a punch. And in some areas, trying to tap in the roll pin might break your receiver, like the ears of the trigger guard. Using a pair of vice grips and "squeezing" the roll pin through is a better option.
After my lower receiver was completed, then came the upper. As a novice at the time, I opted for a complete upper. This is the easy route, as I was told it's a lot more complicated and requires more tools I didn't own to build one yourself, but it just requires more money up front than buying it a little at a time and piecing it together part by part the way I did with the lower receiver.
And that was that. I was done. Except I wasn't. You're never done making rifles. It just meant I was done with THAT rifle... except for changing the grip... and swapping out the forearm for a rail... and changing the stock... and adding a BAD lever...
Then you have extra parts from changing so many out, so you start making another rifle that'll be your "cheap rifle" of all the spare parts. Except it isn't, and you keep buying more and more upgraded parts.
By this time, I was radicalized by people on the internet (tongue firmly placed in cheek, FBI, NSA, BATFE, and CA DOJ), and contemplated lawfully making my own lower receivers that the government wouldn't have any knowledge of. This starts by getting an incomplete lower receiver, or 80% lower as it's commonly referred to, and milling out the pocket that houses the lower parts kit by using a jig and a mill, drill press, or router. I may or may not have bought a mini mill from Harbor Freight, plus all the end mills, drill bits, and hold downs, and could have conceivably taught myself how to be an amateur machinist. The best way to do this is to buy a "burner" 80% lower, one that you are going to intentionally use for practice so you can learn everything you need to know, and screw it up in the process. The second one will hopefully turn out flawless, which if I did complete my own receivers, it was perfect. And so were the next ones.
Since I had more tools now and allegedly was able to figure out how to mill, I thought to myself, "why can't I complete my own upper receivers too?"
So I did, buying one part at a time. I built my first upper for a .308, which was more difficult than a 5.56 due to making sure I got compatible parts. LR308 parts are different from an AR10, so unless you've really gotten into rifle building, try an AR15 first.
Since then it’s just been one part or kit or complete upper after another, finding deals left and right whenever my budget would allow it.
I've been planning my next AR15 build one part at a time starting with the upper. I was going to go with a 16" barrel with a mid length gas system for a softer cycle of a wide range of ammo. For the rail, I've really been wanting a 15" skeleton slimline MLOK, first for the long sight radius (I'm a fan of shooting with iron sights) that a 15" rail provides, second because it's 15" I wanted it to be light, and third it seems like MLOK is going to be the VHS of mounted technology. I know there's die hard fans of keymod, but I've made my choice. Ok, and fourth, I think it’s aesthetically more appealing, which of course is the most important thing when you’re at the range other than what shirt you’re wearing.
I’ll see how this one turns out. I’ll discuss more about specific components in future posts.
Comments
Be the first to comment...